Wednesday, May 16, 2012

bowtie nails!

I was reading Glamour the other day on the three hour train ride home from Chicago (with an Amish man reading over my shoulder the whole time.. kind of awkward) and I stumbled upon this article on Zooey Deschanel's nails. I thought it looked easy enough so I did a tutorial on it for you guys (with a little twist).
here's her nails:


             1. take off your old nail polish. I know, sometimes I just paint over the old too.. but for this you need to because the base color isn't that dark and the old polish will show through. I like this kind from cvs, it's cheap, it doesn't make your hands super dry, and it doesn't use a whole box of tissues or spill everywhere.


2. Paint your nails. I used this OPI color called pink-ing of  you. I thought it was a little more interesting and girlier than just the plain white that zooey has! (although obviously that looked better with her dress). But for lighter colors you will want two coats AT LEAST of polish, otherwise it looks all weird and sheer. 


3. Next you will want to wait for the nails to completely dry and then take an old liquid eyeliner that you have lying around, and pull the brush out, you should rinse it and then dip it in to a black nailpolish for the next part. Here's the eyeliner I used if you want an example. 


4. Then you want to take the eyeliner brush and dip in in your black nail polish. You should make three little dots up each nail. At the top you should make a bow. It took me a little bit to figure this out, at least an easy way to make sure it looked symmetrical, and the easiest is to make a sideways x first, then draw a line at each end, and then fill it in! Heres how mine turned out:

byeeee
xo grace.


Monday, May 14, 2012

DIY Tory Burch Dip-Dye Jeans

If you're just as bored as we are this summer, then you'll love the amount of DIY projects we're posting.
We can't stop making crafts!!!
Anyway, its doing wonders for both our wallets and wardrobes, so you should hop on the DIY bandwagon if you haven't already done so.


Tory Burch Dip-Dyed Denim, $195
Recreating this look is a little tricky. The ombre fade calls for some trial and error stages, but I think if you practice on some old denim first you can really get the hang of it. I'm an impatient person so I just went straight ahead and did this on a good pair of jeans... they turned out all right but I think I could've made them even more fantastic-looking. 

1. Start with a plain pair of jeans. They can be light or medium wash, but I advise against using dark wash jeans. I used a pair of H&M jeggings I bought several years ago.

2. You will need Rit Concentrated Dye (about $4 at any craft supply store). I chose purple dye but there are many other colors.

Left to right.
3. Dissolve the packet of Rit Concentrated Dye in 2 cups of hot water.
4. Make sure to stir so it dissolves completely!
5. Add the solution to a basin of about 3 gallons of hot water and stir. I used a bucket but you can also use a sink.
6. Soak the bottom 6 inches of your jeans (while stirring!) for 10 minutes in the basin. After the 10 minutes***, add in another 6 inches of fabric for 5 minutes (keep stirring!). Then do it again for another 5 minutes.
***I think this is where I messed up. Instead of just adding in more fabric I think I should have taken the jeans out and wrung out the excess dye. Because I didn't do this step, my jeans weren't sufficiently ombre.
7. Hand wash your jeans through hot water until the water runs clear,  and then with cold water. Let dry outside. (I put mine through the washer and dryer as well.)

There you go! Tory Burch style jeans minus the huge blow to your bank account. I'm definitely going to try this again to see if I can make them look more ombre.
-allia

HEADCHAIN DIY

everywhere in magazines and on lookbook I see these super cool people with chains on their heads and/or legs or wherever else. Heres Vanessa Hudgens with one:
isn't it cool?
i decided i could try to make one myself and it actually turned out alright so i'll share it with you guys. 
you'll need:
1. a bunch of old necklaces you don't like wearing anymore.
2. two pairs of pliers
thats it! lalala so easy
1. okay so first what i did is i opened up the loop on one of the necklaces by taking the pliers and using the cutting thing in the back, i made sure that the two necklaces combined was a little bit bigger than the circumference of my head so that it would hang down on the sides like in the picture above.(if the two together is too long just cut off some of the chain of one of the necklaces.)
2. next i just used the two pliers to pull apart the loop (you'll only need to do this once for the circumference because you can just use the clasps of either necklace to connect them on the other side.) then i pinched the loop together around the loop of the other necklace and clasped the other end together so i had one long circle.

3. then you'll need another chain to go across the center of your head, i used a beaded one because i thought it was interesting. if you decide to do that you can tie the ends to the chain, but if not you can just do the same clipping and pinching together of the loops that you did in the first two steps. here's what mine looks like: 


I also added a charm to the center of mine by just connecting the loops together again. 
thanks for readinggg.

xo grace. 


Sunday, May 13, 2012

DIY Topshop American Flag Jorts

Let's be honest here: we're struggling college students. We eat ramen 8 out of the 12 months of the year. We pay for our coffee in change. We spray our clothes with febreeze to avoid paying the $1.25/load charge (is this just me? uh...). We search out sketchy bars with cheap beer, and even after realizing that the beer is 50% water, we still drink it.
Most of us don't have the money to be buying designer label clothes.
(If you do, then good for you. Buy me an effing drink sometime)

$75 Topshop American Flag jorts
So, after months of lusting for a delicious pair of $75 Topshop American Flag jorts, I started thinking. SOMEONE somewhere had to have made those jorts. They sat down with a needle, thread, and some cheap fabric and made those jorts with their bare hands (okay maybe a sewing machine). So I sat down and made those jorts, dammit.
Here's how you can too:


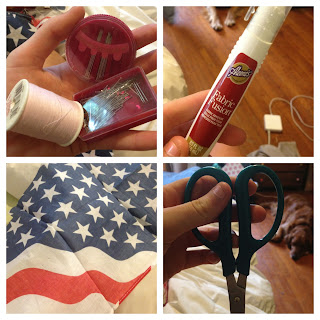
THINGS YOU NEED
1. Needle, thread, and lots of pins
2. Fabric glue
3. Cool fabric (I chose American Flag because I wanted to recreate the shorts)
4. Scissors
1. Find a pair of high-waisted, light-washed jeans in your closet or the Goodwill.
2. Mark off where you're going to cut. (Tip: the cut should be a little lower in the back)
3. Cut.
4. Fold up the hems of the shorts. You will probably need to iron them in place to get them to stay.

1. Lay the fabric over the shorts and pin it down.
2. The pins should be as close to the previous stitching as possible.
3. After you have sewn the fabric onto the shorts and cut off excess fabric, put a small amount of fabric glue over the stitching. This will help keep it in place.
4. A cute doggy can help with emotional support.


Voila! All done!
-allia

Soft Summer Feet

So you've just finished up your finals and are ready to work on your summer tan (24/7 studying has left you with a vampire-like complexion). You go to put on your bikini and flip flops when you see (cue stereotypical horror movie sound bite) YOUR FEET LOOK LIKE DIRTY SHRIVELED CRISPS!! Have no fear, I have the perfect solution to dry feet and just in time for sandal season! 

This is actually the easiest beauty tip ever. 
1. Choose a fairly heavy moisturizing lotion/creme.
2. Apply all over feet.
3. Put on socks.
4. Wear while you're getting ready in the morning.

Tada! Beautiful and soft summer feet.
If your feet are REALLY dry I suggest doing this before bed, using vaseline instead of lotion, and wearing socks while you sleep.

**Grace thinks I'm really weird for doing this because apparently her feet are perfect and naturally soft at all times.

Left to right.
1. Aveda Foot Relief, $20 for 4.2 fl oz - I like this one because it really works and smells like how you'd expect things from Aveda to smell, super natural and calming.
2. The Body Shop Intensive Foot Resolve (Peppermint), $18 for 3.4 fl oz - This one is great to wear to bed because the peppermint and menthol are really calming. It makes your feet feel like you just got a pedicure!
3. The Body Shop Body Butter (Satsuma), $18 for 6.9 oz - My favorite! I've been buying this product since middle school (2006ish?) and I've always bought the same kind: Satsuma. It smells citrus-y and fresh, and I mostly use it as a hand creme but it works well anywhere. The Body Butter line comes in so many more scents (Pink Grapefruit, Vanilla, Coconut, Japanese Cherry Blossom, Shea, etc.) so I suggest trying a small one out (1.7 oz for $6) next time you go shopping.
4. Cetaphil Moisturizing Cream, ~$13 for 16 fl oz - Cetaphil is a great skincare brand, and their moisturizing cream is great for sensitive skin. It is unscented and absorbs into skin quickly. 

-allia

Wednesday, May 2, 2012

if i had a boyfriend.. i would dress him like this.

how to dress cool if youre a guy.

Instagram Insider


1. Allison with her sweet dumpling bunny.. made of chopsticks. After discovering Lulu's in Evanston, we have clearly become obsessed.. third weeks in a rowww!
2. The view from my dorm room.. only have a few more weeks of this pretty picture. /:
3. I have recently become a huge one direction fan. Here I am showcasing my new phone background and future boyfriend, Niall.
4. I cut my hair! And donated to locks of love. I've only done it twice so far but it's a really great cause and I think everyone should do it once.
blah blah blah
check out one direction. I'm obsessed.
seriously.
<3 grace.